Perfect Cherry Pie Recipe: Flaky Crust & Juicy Filling
Let’s be real for a second cherry pie is basically happiness in dessert form. There’s something magical about that sweet-tart filling spilling out of a golden, flaky crust that makes you want to ditch your diet and eat a whole pie with a spoon (don’t pretend you haven’t thought about it 😏). If you’ve ever stared longingly at a bakery window and whispered, “I wish I could make that,” I’ve got good news: you can, and it’s not as scary as it looks.
I’ve been baking pies for years, and cherry has always held a special place in my heart. There’s a certain nostalgia in biting into a pie that reminds you of summer picnics, grandma’s kitchen, or those rare moments when life feels…simple. Today, I’m going to walk you through a cherry pie recipe that’s approachable, fun, and guaranteed to make your kitchen smell like heaven. Ready? Let’s dive in.
Why Cherry Pie Deserves a Spot in Your Kitchen
Ever wonder why cherry pie has this iconic status among desserts? I mean, we all know apple pie gets a lot of hype, but cherry pie is pure drama and flavor in one bite. Here’s why I think it’s a kitchen must-have:
- Sweet and Tart Balance: Cherry pie hits the perfect sweet-tart combo. It’s not overly sugary, but it’s also not biting-your-tongue sour.
- Versatile for Occasions: Whether it’s a casual Friday night, a holiday feast, or just an excuse to celebrate surviving the week, cherry pie fits right in.
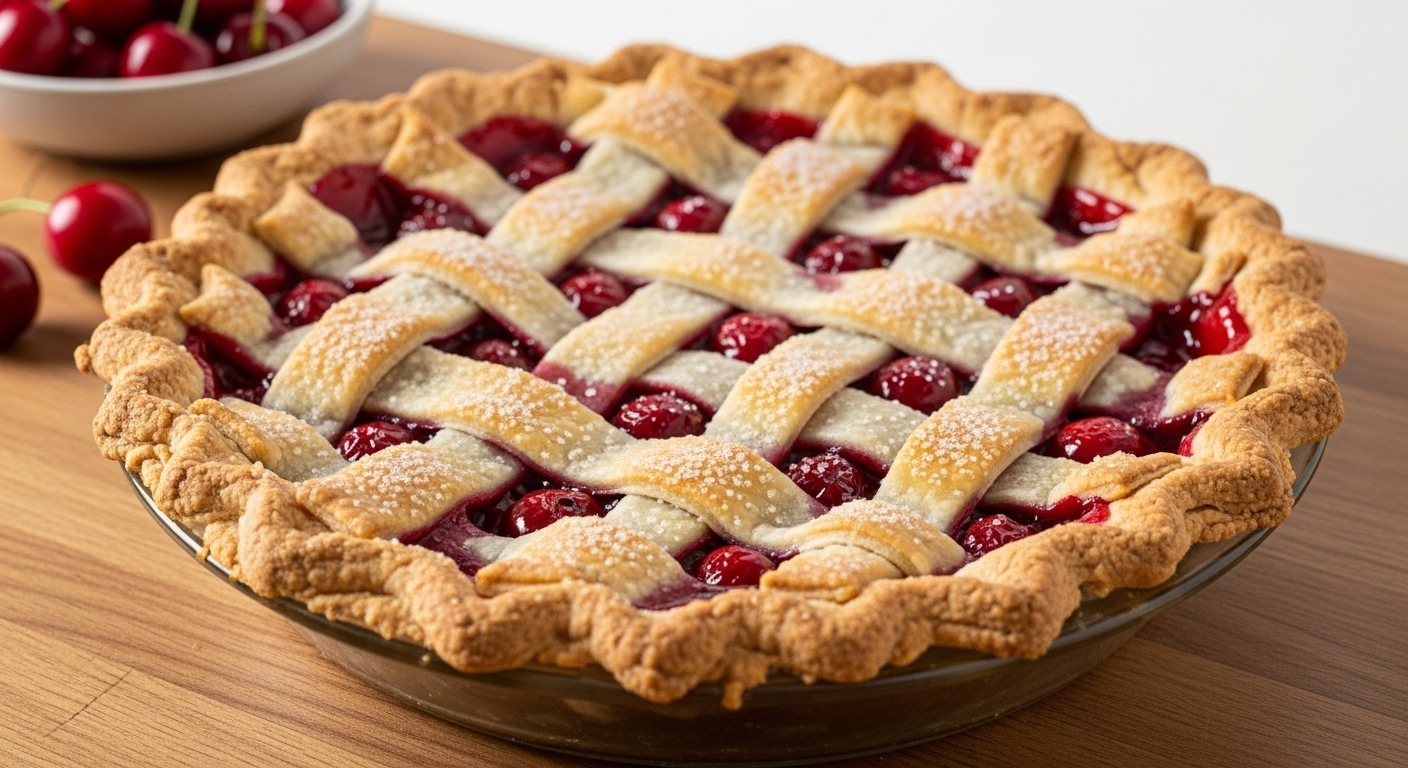
- Showstopper Looks: That glossy, red filling poking through a lattice crust? Instant dessert envy.
IMO, baking cherry pie is as much about the experience as the eating. Mixing the filling, rolling out the crust, and smelling that almond extract wafting through the kitchen? Therapy. 🍒
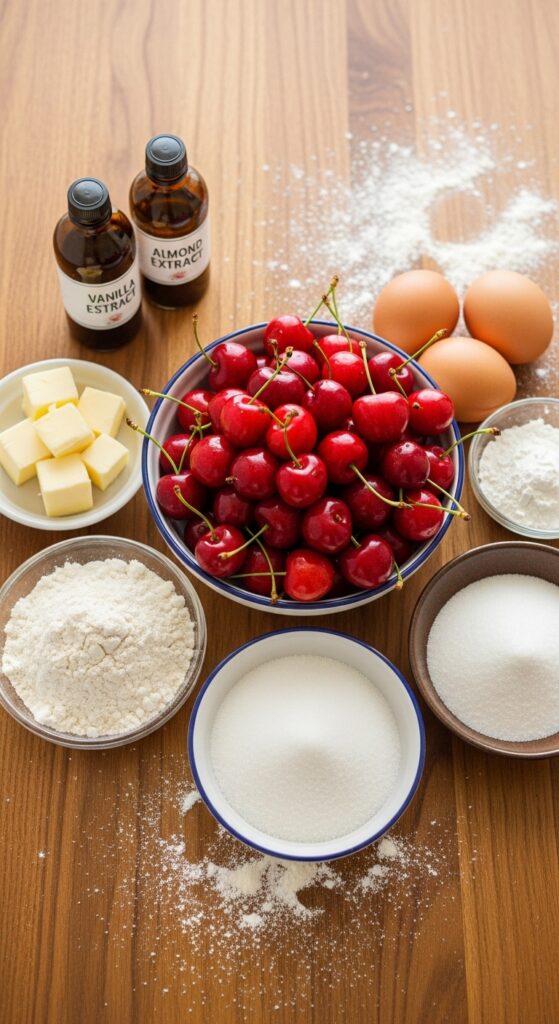
Ingredients You’ll Need for the Perfect Cherry Pie
Before we get messy with flour on your counter (or keyboard, no judgment), let’s gather our ingredients. I like to prep everything first; it makes the whole baking process feel way less stressful.
For the Crust
- 2 ½ cups all-purpose flour – the base for flakiness
- 1 tsp salt – enhances flavor
- 1 tbsp sugar – optional, but I like a subtle sweetness
- 1 cup unsalted butter (cold and cubed) – the magic behind flakiness
- 6–8 tbsp ice water – helps bring the dough together without melting the butter
For the Cherry Filling
- 4 cups fresh or frozen cherries – pit them unless you want teeth souvenirs
- 1 cup granulated sugar – adjust depending on cherry sweetness
- 3 tbsp cornstarch – thickens the filling without being gummy
- 1 tsp vanilla extract – gives depth of flavor
- ½ tsp almond extract (optional) – OMG, this elevates it to bakery level
- A pinch of salt – balances the sweetness
Extras
- 1 egg (beaten) – for brushing the crust to get that golden glow
- 1 tbsp sugar for sprinkling – because everything’s better with sparkle
Tip: If you’re feeling fancy, you can even make a lattice crust. It’s not hard, I promise, and it’s Instagram-worthy.
Making the Perfect Pie Crust: The Flaky Factor
I’m going to be honest: the crust is half the pie battle, and getting it right feels like winning at baking life. Here’s my method to make a crust that practically melts in your mouth.
Step 1: Chill Everything
Cold butter + cold water = flaky magic. Seriously, don’t skip this. I’ve tried room-temp butter before…big mistake.
Step 2: Mix the Dry Ingredients
- Toss your flour, salt, and sugar into a large bowl.
- Whisk them together like you mean it.
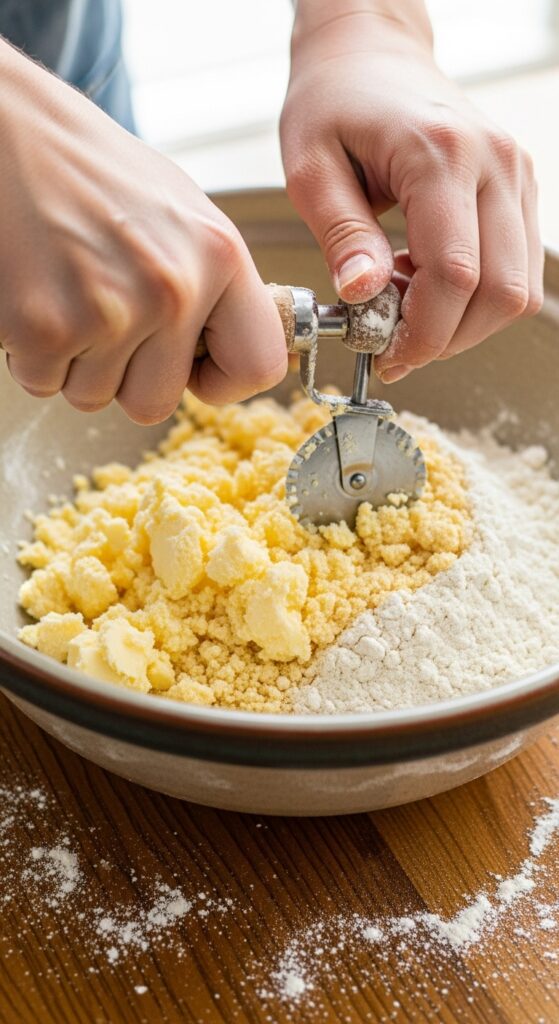
Step 3: Cut in the Butter
- Use a pastry cutter, fork, or your hands (if you’re brave) to cut the butter into the flour until it resembles coarse crumbs.
- Little pea-sized chunks are perfect. Why? Because they create layers in the crust.
Step 4: Add Ice Water
- Slowly drizzle in ice water and mix until dough starts to hold.
- Divide into two discs (top and bottom crust) and wrap in plastic. Refrigerate at least 30 minutes.
Pro tip: If your dough feels sticky, toss it back in the fridge for 10–15 minutes. Trust me, patience pays off.
Preparing the Cherry Filling
Now for the fun part: that gooey, vibrant cherry filling that makes people weak in the knees.
Step 1: Pit and Prep
- If using fresh cherries, pit them. Frozen cherries work too; just thaw and drain a bit.
- FYI: I keep a cherry pitter in my kitchen; it’s a lifesaver.
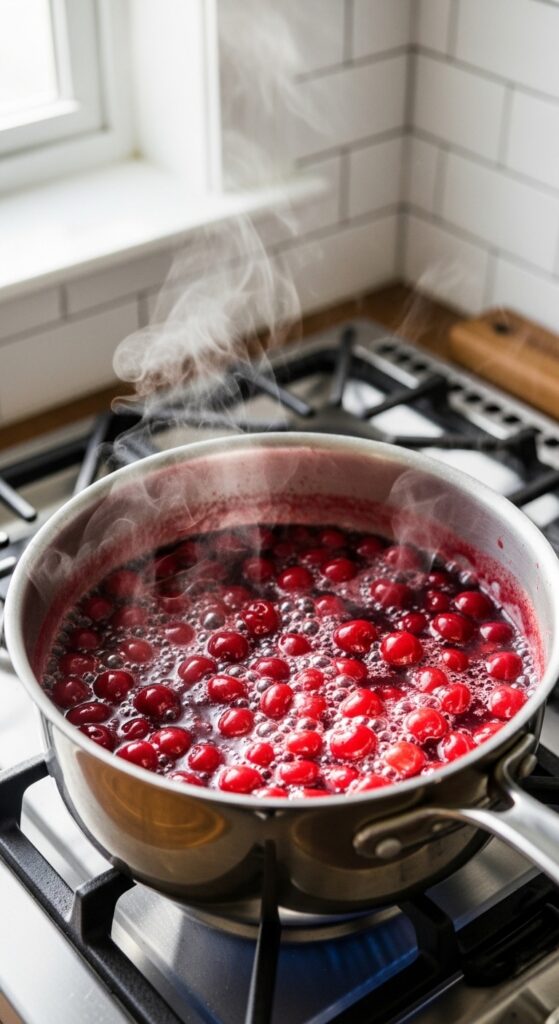
Step 2: Combine Ingredients
- In a medium saucepan, toss cherries, sugar, cornstarch, salt, and extracts.
- Cook over medium heat until it thickens slightly and bubbles start to form.
Step 3: Cool Before Filling
- Let the filling cool to room temperature.
- Why? Hot filling can turn your crust into a soggy mess. Nobody likes soggy pie.
Assembling Your Cherry Pie
Here’s where the magic happens. You’ve got your buttery crust and your dreamy filling let’s bring them together.
Step 1: Roll Out the Bottom Crust
- Flour your surface and roll out one dough disc to fit your 9-inch pie pan.
- Don’t worry about perfect edges; rustic charm is totally acceptable.
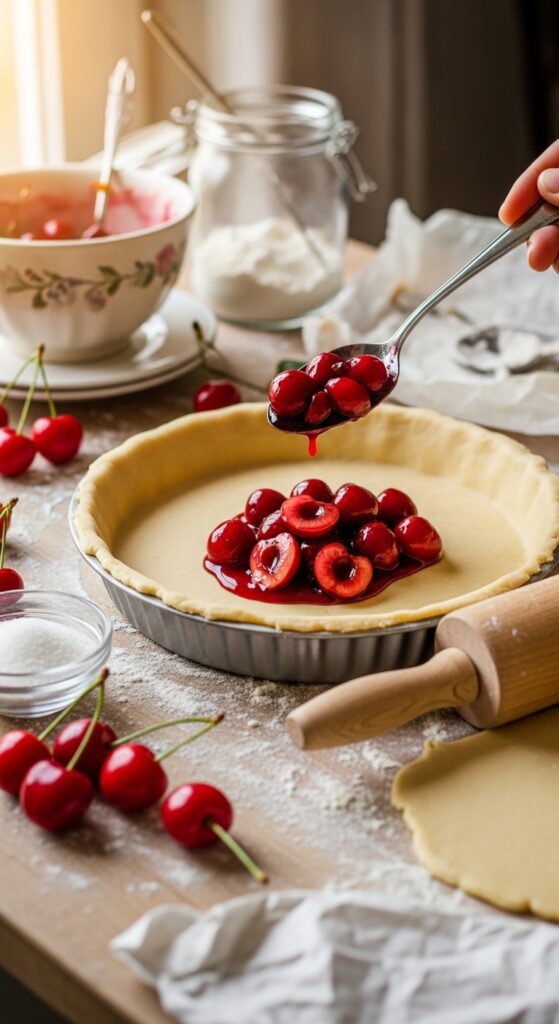
Step 2: Add the Filling
- Spoon your cooled cherry mixture into the crust.
- Spread evenly, but don’t overfill—your pie should stay contained.
Step 3: Top Crust or Lattice
- Roll out the second dough disc. You can go solid, slits, or lattice.
- If you’re feeling artsy, lattice is super satisfying to make (and looks fancy).
Step 4: Seal and Egg Wash
- Pinch the edges together and trim excess dough.
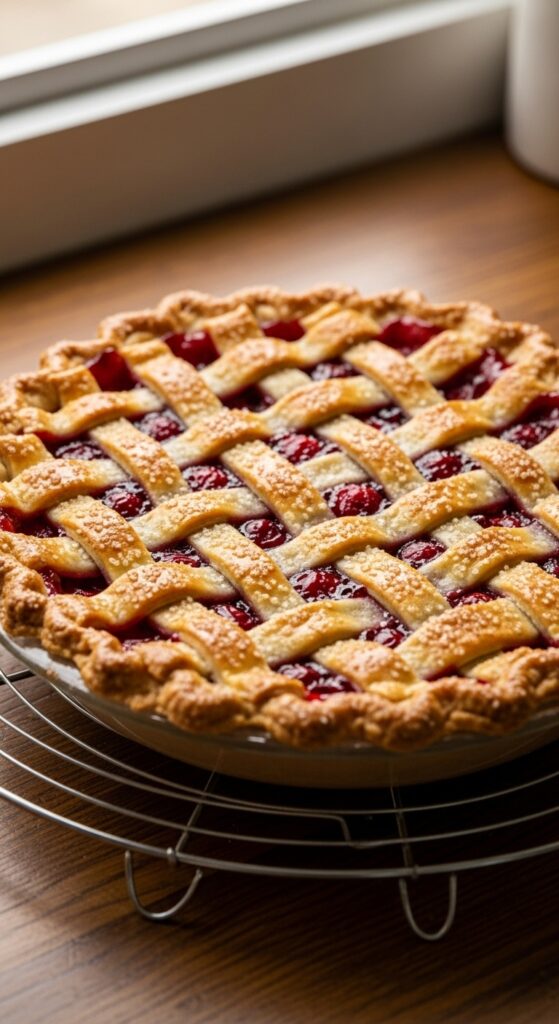
- Brush with beaten egg and sprinkle sugar on top. This gives a golden, crunchy finish.
Step 5: Vent
- Cut a few small slits if using a solid top crust so steam can escape. Otherwise, your pie may try to erupt in the oven.
Baking Your Cherry Pie
Finally, the part everyone waits for watching your creation turn golden.
Step 1: Preheat Oven
- Preheat to 425°F (220°C).
Step 2: Bake
- Bake 20 minutes at 425°F, then reduce to 350°F (175°C) for 35–40 minutes.
- Keep an eye on it: if the edges brown too fast, cover them with foil.
Step 3: Cool
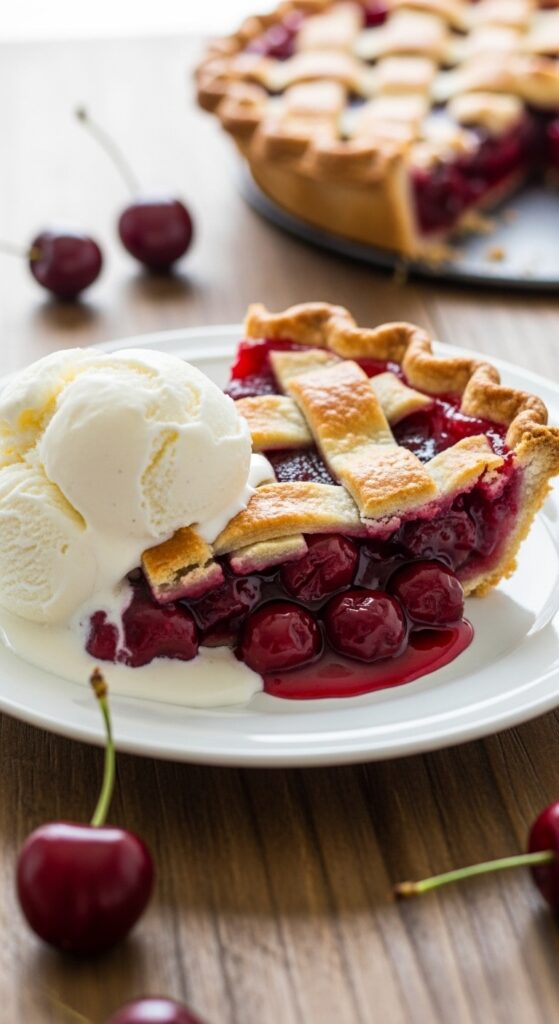
- Let the pie cool at least 2 hours before slicing.
- I know, I know…waiting is hard. But it sets the filling so it won’t run everywhere.
Pro tip: Serve with vanilla ice cream or a dollop of whipped cream. Trust me, it’s a flavor explosion.
Tips for Baking Cherry Pie Like a Pro
Not gonna lie, there are a few hacks that make a world of difference. Here are my favorites:
- Frozen Cherries Are Your Friend: They’re sweet, tart, and consistent.
- Cornstarch vs. Flour: Cornstarch thickens without clouding your filling. Flour can make it cloudy and pasty.
- Chill Your Tools: Cold butter, cold water, cold bowl = flaky perfection.
- Don’t Overwork Dough: Over-kneading equals tough crust. Chill and relax, like we do on weekends.
- Almond Extract: Optional, but honestly, it makes your pie smell like bakery royalty.
Common Mistakes (And How to Avoid Them)
I’ve had my fair share of pie fails. Let me save you the heartbreak:
- Soggy Bottom: Use a cooled filling and pre-chill your crust. Some even blind-bake the bottom for 10 minutes.
- Crust Shrinking: Don’t stretch dough into the pan; let it relax naturally.
- Overly Sweet Filling: Taste your cherries first. Adjust sugar depending on tartness.
- Burnt Edges: Cover them with foil halfway through baking. Easy fix.
Variations to Try
If you’re feeling adventurous or just want to brag about your skills:
- Cherry-Almond Pie: Boost almond extract and sprinkle sliced almonds on top.
- Double Crust with Sugar Crystals: Adds crunch and visual appeal.
- Mini Cherry Pies: Perfect for portion control (aka eating three without guilt).
- Boozy Cherry Pie: Splash some brandy or kirsch into the filling. Adult dessert level unlocked.
Serving and Storing Cherry Pie
Once baked, cherry pie is best enjoyed fresh. But if you have leftovers (lucky you 😏):
- Room Temperature: 1–2 days is ideal.
- Refrigerator: Store covered for up to 5 days.
- Freezing: Wrap tightly in plastic wrap + foil, freeze up to 2 months. Thaw overnight before serving.
Slice generously, serve with ice cream, and watch people disappear into pie bliss.
Why Homemade Cherry Pie Beats Store-Bought
Honestly, the difference is like night and day.
- Control Over Sweetness: You decide how sweet or tart.
- Fresh Ingredients: No weird preservatives.
- Customizable Crust: Flaky, buttery, or even chocolate (don’t knock it ‘til you try).
- Therapeutic Baking: Seriously, kneading and rolling dough is oddly satisfying.
Store-bought pies are convenient, sure, but nothing beats that first slice with a forkful of homemade goodness.
Final Thoughts
There you have it, a cherry pie recipe that’s approachable, fun, and utterly delicious. From flaky crust to juicy filling, it’s a dessert that brings smiles and makes your kitchen smell like a dream.
Remember: baking is as much about the journey as the end result. Don’t stress about perfect lattice or precise sugar measurements. Taste, fun, and love are the secret ingredients.
So, grab some cherries, get that butter cold, and bake yourself a slice of happiness. And if someone asks who made it? Smile knowingly and say, “It was all me, thank you very much.” 😉