Lumpiang Shanghai Recipe: How to Make Crispy Filipino Spring Rolls at Home
Okay, let’s be real. Lumpiang Shanghai is basically the MVP of Filipino appetizers. Seriously, who can resist those tiny, golden rolls packed with juicy goodness? I still remember the first time I tried making them at home it was a disaster. Somehow, I ended up with a greasy mess that looked nothing like the picture-perfect rolls from the party trays. 😅 But hey, practice makes perfect, right?
If you’ve ever wanted to master lumpiang Shanghai at home, this guide is basically your new best friend. I’ll walk you through everything from picking the right ingredients to achieving that coveted crisp without turning your kitchen into a deep-fried disaster zone.
Why Lumpiang Shanghai is a Must-Try
Let’s address the elephant in the room: why do we all love lumpiang Shanghai so much?
- Bite-sized heaven: These little rolls are perfect for snacking, parties, or just munching in front of Netflix.
- Juicy, flavorful filling: Unlike some fried snacks that are just oil and wrapper, lumpiang Shanghai packs a punch with meat, veggies, and seasonings.
- Versatile AF: You can tweak the filling, sauce, or even go fully vegetarian if you’re feeling adventurous.
Honestly, once you nail this recipe, you’ll wonder why you ever bought frozen ones from the store. IMO, nothing beats that homemade crunch and flavor.
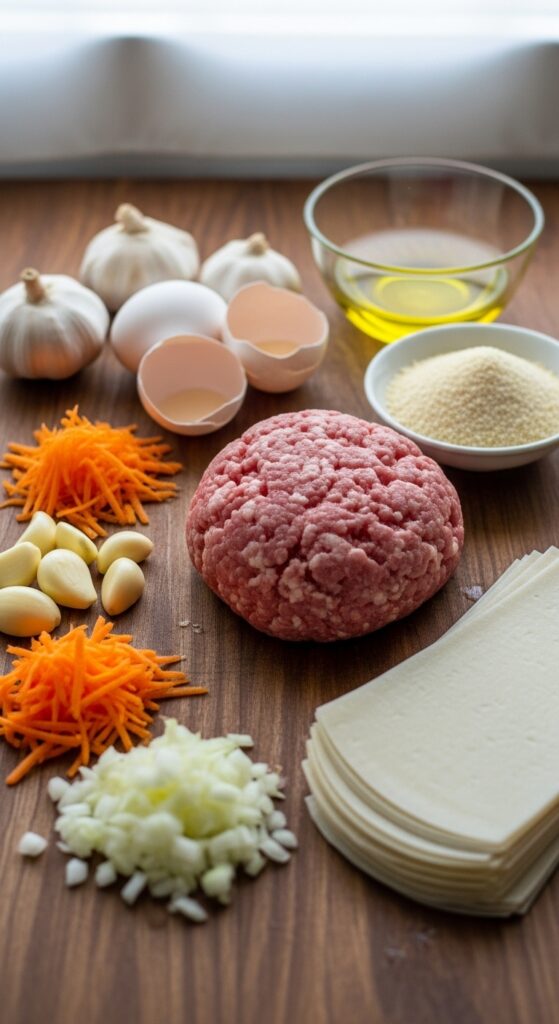
Ingredients: What You’ll Need
Let’s start with the basics. Here’s a breakdown of the ingredients you’ll need for a standard batch (about 30 rolls):
For the Filling:
- 1 lb ground pork – This is the classic choice. You can also do beef, chicken, or even a mix.
- 1 medium carrot, finely grated – Adds sweetness and color.
- 1 small onion, finely chopped – Don’t skip this. It’s the flavor base.
- 3 cloves garlic, minced – Because garlic makes everything better.
- 1/2 cup breadcrumbs – Helps bind the filling without making it dry.
- 1 egg – Also for binding.
- Salt & pepper to taste – Basic, but crucial.
- Optional: chopped green onions, water chestnuts, or shrimp bits for extra flair.
For Wrapping:
- Lumpia wrappers – You can buy these fresh or frozen at Asian stores.
- 1 tsp flour + water mixture – This acts as glue to seal your rolls.
For Frying:
- Vegetable oil – Enough to shallow or deep fry, depending on your preference.
FYI, don’t overthink the ingredients. The beauty of lumpiang Shanghai is its simplicity. A few tweaks here and there, and you’ve got your own signature rolls.
Step-by-Step Lumpiang Shanghai Recipe
Now comes the fun part making these little guys. Don’t worry; it’s easier than it looks.
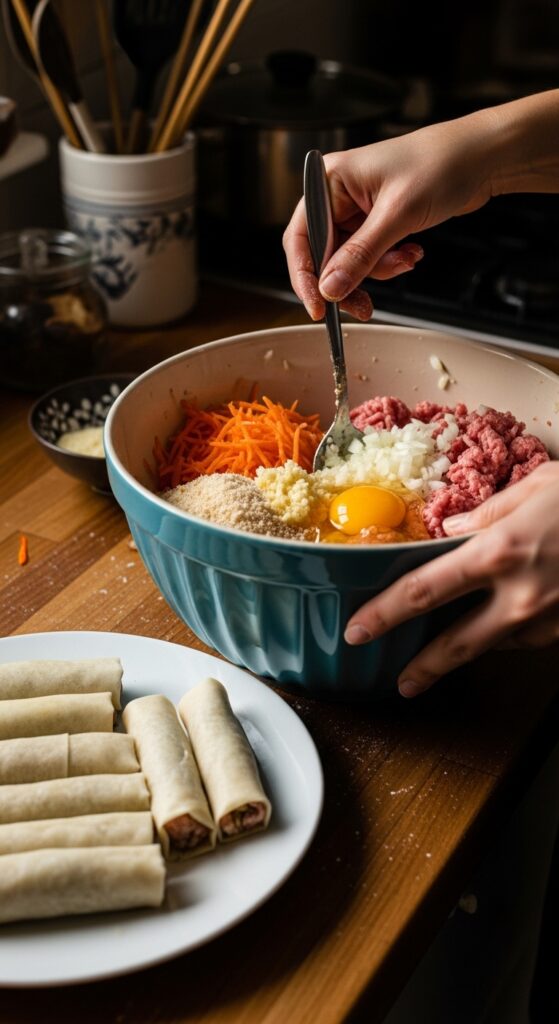
Step 1: Mix the Filling
- In a large bowl, combine ground pork, grated carrot, chopped onion, garlic, breadcrumbs, and egg.
- Season with salt and pepper.
- Mix everything thoroughly. I usually use my hands call me old-school, but it works best.
Pro tip: Taste a tiny bit of the raw mixture by pan-frying a small ball. This helps you adjust seasoning before wrapping everything. Trust me, it saves lives (and taste buds).
Step 2: Wrap the Rolls
- Lay a lumpia wrapper on a flat surface, with one corner pointing toward you (like a diamond).
- Spoon 1–2 tablespoons of filling near the corner closest to you.
- Roll tightly, fold the sides in, and continue rolling until sealed.
- Dab the tip with the flour-water mixture to keep it from opening while frying.
Quick tip: Don’t overfill! It’s tempting, I know, but overstuffed lumpia = messy, sad lumpia.
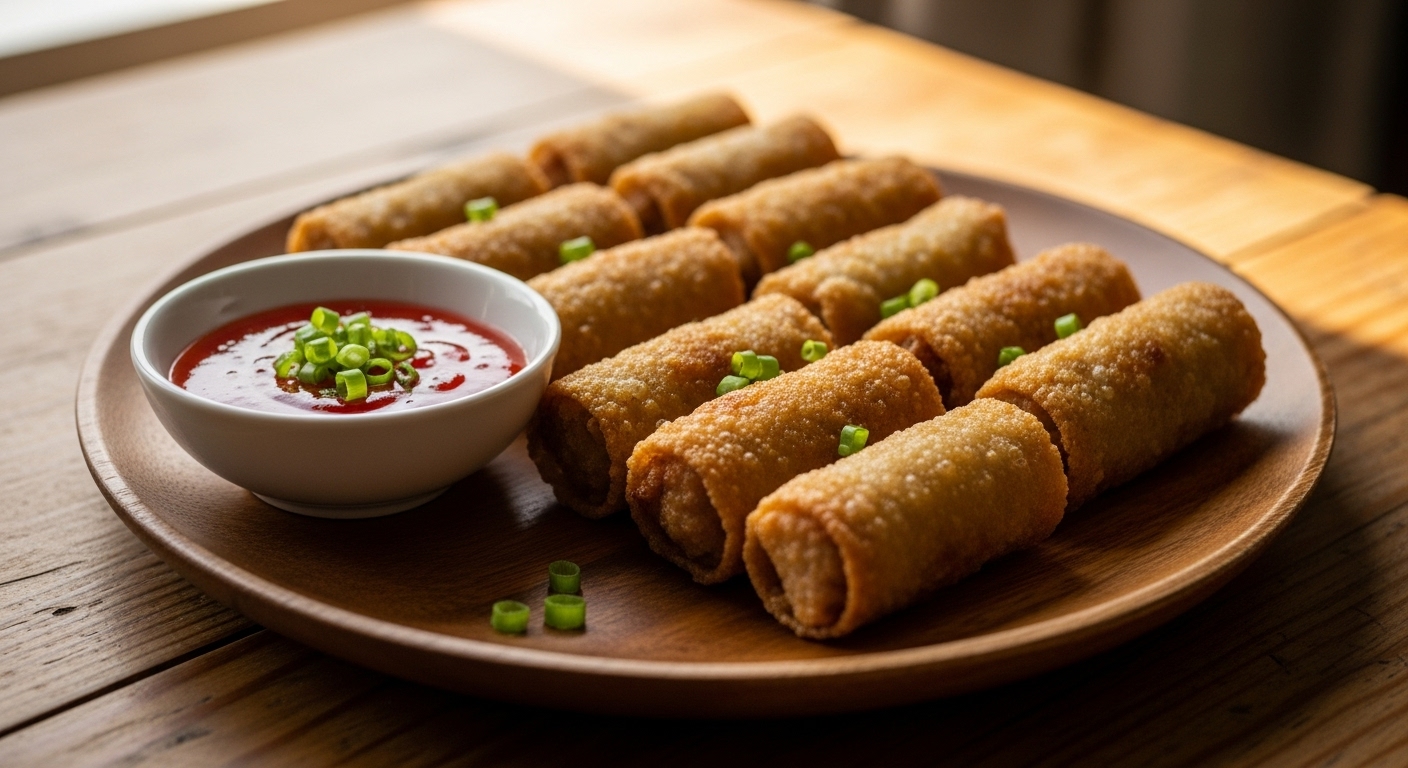
Step 3: Fry to Golden Perfection
- Heat 1–2 inches of vegetable oil in a pan over medium heat.
- Fry the rolls in batches, turning occasionally, until golden brown and crispy (about 3–5 minutes per batch).
- Transfer to a plate lined with paper towels to drain excess oil.
Hot take: If you want less oil, you can bake them at 375°F for 20–25 minutes, turning halfway. Not as crispy as deep-fried, but still delish.
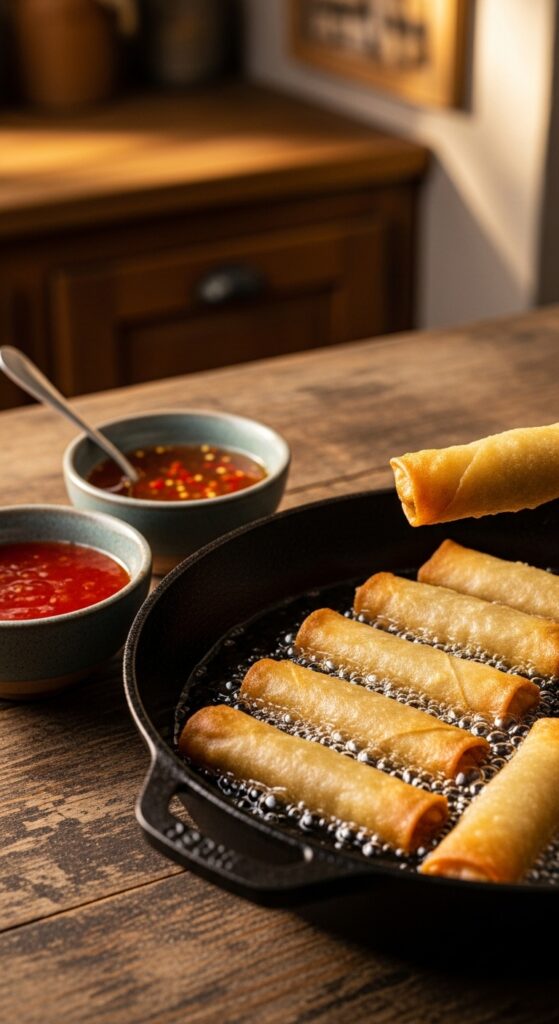
Sauces: The Secret Weapon
Let’s get real. Lumpiang Shanghai without a good dipping sauce is like pizza without cheese. Here are some classic choices:
Sweet and Sour Sauce
- 1/2 cup ketchup
- 1/4 cup sugar
- 1/4 cup vinegar
- 1/4 cup water
- 1 tsp cornstarch
Mix in a saucepan over low heat until thick. Boom, dip heaven.
Spicy Vinegar Dip
- 1/2 cup vinegar
- 3 cloves garlic, minced
- 1 small chili, sliced
- Pinch of salt and sugar
Simple, tangy, and packs a punch if you like heat.
Mayo-Ketchup Mix (Kid-Friendly)
- Equal parts mayonnaise and ketchup
- Optional: a dash of garlic powder or paprika
Honestly, I switch between these depending on my mood. FYI, I can eat an entire batch of lumpia with just sauce. Don’t judge. 😏
Tips & Tricks for Perfect Lumpiang Shanghai
Even though the recipe seems straightforward, a few tweaks can make all the difference:
- Chill the filling – Makes wrapping easier and prevents the filling from falling apart.
- Dry the wrappers – Moist wrappers = soggy fried lumpia. Keep them covered with a damp cloth, not wet.
- Fry in small batches – Crowding the pan drops oil temperature and leads to limp rolls.
- Consistent size – Try to keep each roll roughly the same size for even cooking.
- Oil temperature matters – Too hot? Burned outside, raw inside. Too low? Greasy lumpia. Medium heat is your BFF.
Variations You Have to Try
Here’s where you can get creative. Don’t limit yourself to the classic pork version.
Chicken Lumpiang Shanghai
- Swap pork with ground chicken.
- Slightly less fat, but still juicy if you add a bit of grated carrot and onion.
Shrimp Twist
- Mix chopped shrimp with pork or chicken for extra seafood flavor.
- Works beautifully with sweet chili dipping sauce.
Veggie Lover’s Lumpia
- Use mushrooms, tofu, cabbage, and carrots.
- Season generously veg fillings need extra flavor punch.
Cheese-Stuffed Version
- Add a small piece of cheese in the center before rolling.
- Melty goodness guaranteed.
Honestly, experimenting is half the fun. Ever tried putting a tiny piece of cream cheese inside? Mind blown.
Storing and Reheating Lumpia
Not everyone eats a full batch in one sitting (though I wish I did). Here’s how to keep your lumpia game strong:
- Fridge: Store uncooked lumpia in an airtight container for up to 2 days.
- Freezer: Lay them on a tray first, freeze until firm, then transfer to a ziplock bag for up to 1 month.
- Reheat: Deep fry straight from frozen or bake at 375°F for 15–20 minutes.
Pro tip: Don’t microwave you’ll lose that crunch instantly, and nobody wants sad, soggy lumpia.
Common Mistakes to Avoid
Even seasoned cooks mess up sometimes. Here’s what I see the most:
- Overfilling – Leads to split wrappers and lost filling.
- Wet wrappers – Seriously, this is a soggy roll crime.
- Crowded pan – Oil temperature drops, results in greasy lumpia.
- Skipping seasoning – Don’t rely on the sauce to fix bland filling.
Avoid these, and your lumpia will be practically Instagram-worthy.
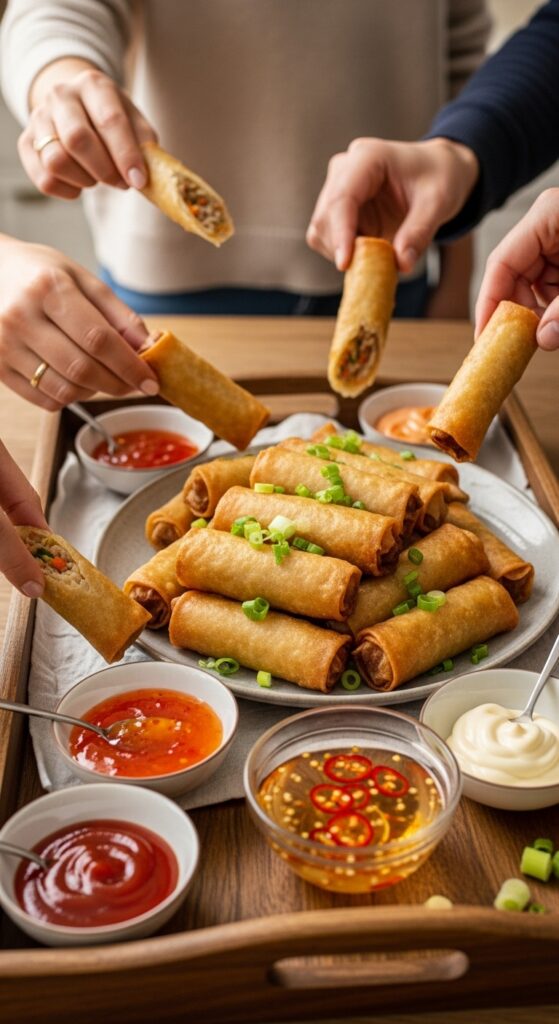
Serving Suggestions
Here’s the best part: how to serve these babies.
- Party trays: Perfect bite-sized snack for family or friends.
- With rice: Yep, lumpia + rice = heaven, don’t @ me.
- As a side dish: Pairs well with pancit or Filipino-style noodle dishes.
Honestly, I’ve eaten them straight out of the fryer with no shame. You can too.
Personal Touch: Why I Love Making Lumpiang Shanghai
I won’t lie making lumpiang Shanghai can be a bit of a process, but it’s so worth it. There’s something satisfying about rolling each piece carefully, frying them to golden perfection, and watching everyone dig in.
Plus, it’s one of those dishes where everyone will think you’re a pro, even if it took you three tries to get right. And FYI, the leftovers (if you somehow have any) taste even better the next day.
Final Thoughts
So there you have it your ultimate guide to lumpiang Shanghai. From mixing the filling to frying golden perfection and picking the right dipping sauce, you’re basically ready to host a mini lumpia party at home.
Remember these key points:
- Keep your rolls tight and your oil medium-hot.
- Season everything well don’t rely on sauces alone.
- Experiment with fillings to make it your own.
Trust me, once you get this down, you’ll never need store-bought lumpia again. And hey, even if a few rolls split or go a bit too brown, who cares? They still taste amazing. 😎
Now grab that ground pork and wrappers and start rolling. Your taste buds (and your friends) will thank you.